git 的中级使用教程
记录一些使用率中等的 git 命令
设置用户名和邮箱
1
2
3
| $ git config --global user.name "Your Name"
$ git config --global user.email "email@example.com"
|
配置别名
使用 git status 太长了怎么破
1
2
3
4
5
6
| $ git config --global alias.st status
$ git config --global alias.co checkout
$ git config --global alias.ci commit
$ git config --global alias.br branch
$ git config --global alias.unstage 'reset HEAD'
$ git config --global alias.last 'log -1'
|
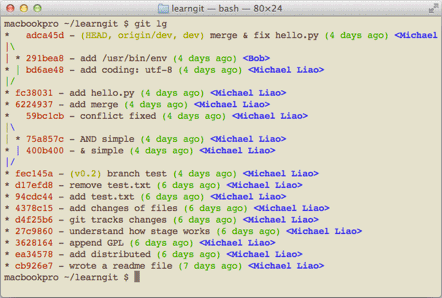
还有这种操作
1
| $ git config --global alias.lg "log --color --graph --pretty=format:'%Cred%h%Creset -%C(yellow)%d%Creset %s %Cgreen(%cr) %C(bold blue)<%an>%Creset' --abbrev-commit"
|
结果如下
生产 SSH Key
1
2
3
4
| ssh-keygen -t rsa -C "youremail@example.com"
//生产的公钥私钥 会放到服务器的 ~/.ssh/authorized_keys目录下
|
添加远程仓库
本地文件夹添加远程仓库并且推送上去,基础文章已经写过这里再次复习一遍
1
2
3
4
| $ git remote add origin git@github.com:michaelliao/learngit.git
$ git push -u origin master
|
分支管理策略--no-ff
通常,合并分支时,如果可能,Git 会用Fast forward 模式,但这种模式下,删除分支后,会丢掉分支信息。
如果要强制禁用Fast forward模式,Git 就会在 merge 时生成一个新的 commit,这样,从分支历史上就可以看出分支信息。
1
2
3
4
5
6
| $ git merge
Merge made by the 'recursive' strategy.
readme.txt | 1 +
1 file changed, 1 insertion(+)
|
合并后的结果如下
1
2
3
4
5
6
7
| $ git log
* 7825a50 merge with no-ff
|\
| * 6224937 add merge
|/
* 59bc1cb conflict fixed
...
|
保存工作现场
1
2
3
4
5
6
7
8
9
10
11
| $ git stash
Saved working directory and index state WIP on dev: 6224937 add merge
HEAD is now at 6224937 add merge
$ git stash list
$ git stash pop
$ git stash apply stash@
|
删除远程分支
1
2
3
4
| $ git push origin :master 等同于下面的命令推送一个空分支对应远程分支
$ git push origin --delete master
|
丢弃暂存区文件
如果一个文件已经 add 到暂存区,还没有 commit,此时如果不想要这个文件了,有两种方法
1
2
3
| $ git reset HEAD 用版本库内容清空暂存区
$ git rm --cache 删除缓存区内容
|
允许空提交
即没有任何更改进行 commit, 之所以需要这种是我们开发时制定分支推送会部署代码但是有时候没有代码提交只想单独部署这样可以进行推送从而触发部署
1
| $ git commit --allow-empty -m "empty"
|
文件夹大小写问题
git 提交文件夹默认是不区分大小写的也就是说 max/file 和 Max/file 对于远端来说是一样的这样就会有本地和远端文件夹不一样的问题。带来的后果就是 java 起名字的时候如果文件夹有大小写有可能不识别会有找不到类的问题
1
2
| $ git config core.ignorecase false
|
git reset 的后悔药
当使用 git reset --hard xxx 回退到之前的版本,我又想回到最新的版本如何操作呢
1
2
3
4
5
6
7
8
9
10
11
| $ git reflog
git reflog --relative-date
ea34578 HEAD@{0}: reset: moving to HEAD^
3628164 HEAD@{1}: commit: append GPL
ea34578 HEAD@{2}: commit: add distributed
cb926e7 HEAD@{3}: commit (initial): wrote a readme file
|
这样之后又可以使用 reset –hard xxx 乘坐时光机返回了。
git clean
该命令将未跟踪的文件从工作目录中删除,同 git status 然后手动删除一样。该命令无法撤销慎重使用。
1
2
3
4
5
6
7
8
9
10
| $ git clean -n //进行预演告诉你哪些文件会被删除并不是真的删除
$ git clean -f //删除所有未跟踪文件 <code>-f</code>是必须的
$ git clean -f <path> //移除未跟踪的文件,但限制在某个路径下。
$ git clean -df //移除未跟踪的文件,以及目录。
$ git clean -xf //移除当前目录下未跟踪的文件,以及 Git 一般忽略的文件。
|
reset+clean
1
2
3
4
5
6
7
8
9
|
git reset
git clean -df
|
在执行了 reset/clean 的流程之后,工作目录和缓存区和最近一次提交看上去一模一样,而 git status 会认为这是一个干净的工作目录。你可以重新来过了。
注意,不像 git reset 的第二个栗子,新的文件没有被加入到仓库中。因此,它们不会受到 git reset –hard 的影响,需要 git clean 来删除它们。
reset 其他用法
git reset 命令既可以回退版本,也可以把暂存区的修改回退到工作区。当我们用 HEAD 时,表示最新的版本。
1
2
3
4
5
6
7
8
9
10
11
12
13
14
15
16
17
18
19
20
21
22
23
24
25
26
27
28
29
30
31
32
33
34
| $ git status
$ git reset HEAD readme.txt
Unstaged changes after reset:
M readme.txt
git add .
git reset main.py
git commit -m "Make some changes to hello.py"
git add main.py
git commit -m "Edit main.py"
|
- git checkout – xxx 丢弃工作区间的修改 此时没有 add
- git reset HEAD xxx 将暂存区的文件撤销放回到工作区间 ,此时已经 add
git checkout
这里有个 checkout 的用法比较少用感觉用 reset 比较多,通常来说 git checkout 会有三种用法: 检出文件,检出提交和检出分支,一般我们只关心前两种
1
2
3
4
5
6
7
8
| $ git checkout master
$ git checkout <commit> <file>
$ git checkout a1e8fb5 hello.py
$ git checout <commit>
|
配置文件
配置 Git 的时候,加上–global 是针对当前用户起作用的,如果不加,那只针对当前的仓库起作用
每个仓库的 Git 配置文件都放在.git/config 文件中
1
2
3
4
5
6
7
8
9
10
11
12
13
14
15
16
| $ cat .git/config
[core]
repositoryformatversion = 0
filemode = true
bare = false
logallrefupdates = true
ignorecase = true
precomposeunicode = true
[remote "origin"]
url = git@github.com:michaelliao/learngit.git
fetch = +refs/heads/*:refs/remotes/origin/*
[branch "master"]
remote = origin
merge = refs/heads/master
[alias]
last = log -1
|
前用户的 Git 配置文件放在用户主目录下的一个隐藏文件.gitconfig 中
1
2
3
4
5
6
7
8
9
10
| $ cd ~
$ cat .gitconfig
[alias]
co = checkout
ci = commit
br = branch
st = status
[user]
name = Your Name
email = your@email.com
|
使用.gitignore
有些时候,你想添加一个文件到 Git,但发现添加不了,原因是这个文件被.gitignore 忽略了:
如果你确实想添加该文件,可以用-f 强制添加到 Git:
或者你发现,可能是.gitignore 写得有问题,需要找出来到底哪个规则写错了,可以用 git check-ignore 命令检查
1
2
3
4
| $ git add -f App.class
$ git check-ignore -v App.class
.gitignore:3:*.class App.class
|
如何删除一些无用分支
远程已经删除但是本地还存在。
这种操作通常是我新建分支改完 bug 推送远程合并结束后,远程分支删掉了本地分支也删掉但是 branch -a 的时候还存在想删除本地远程分支数据库中的分支时使用。
1
2
3
4
5
6
7
8
9
|
$ git fetch origin --prune
$ git fetch -p origin
$ git fetch origin -p --progress
$ git remote update --prune 也可以生效不过我没试过😓
|
总有最笨的方法
1
| $ git branch -d -r origin/branch_name
|
本地分支与远程分支对应
第一种情况
新建分支直接创建新分支推送到远端即可
第二种情况
本地没有分支远端有分支 dev
可以 git fetch ,然后直接新建分支跟远端分支名字一样 dev 就可以建立链接。
另一种解决方案
情况二的领域中解决方案
要在 dev 分支上开发,就必须创建远程 origin 的 dev 分支到本地,于是用这个命令创建本地 dev 分支
1
2
3
4
5
6
7
8
9
10
11
| $ git checkout -b dev origin/dev
如果此时报错 no tracking information 需要将远程dev和本地dev分支建立链接
$ git branch --set-upstream dev origin/dev
$ git branch --track dev origin/dev
|
参考文章